 It’s time for a geek related post! As some of you may have read I recently modified the twenty ten default WordPress theme. You normally don’t want to be working on a “live” website when trying to make changes to it. Ideally you want a copy of your current blog so you can “test” different features before you place them on your live website.
I’m going to be walking you through the steps of setting up a Slackware 13.1 LAMP (Linux, Apache, Mysql, PHP) machine. A Slackware lamp howto, so to speak. I’ve always had a preference for Slackware Linux. I was told (what seems like way too long ago now) that Slackware would allow you to get a better feel for administering a Unix machine than other versions of Linux. What I did was setup a virtual machine running on my windows system. This should also work on a local copy of Slackware (dual booting between windows and Slackware for instance).
Some assumptions to being with:
- You have a running version of Slackware, in my case I’m using 13.1 This should work with most versions of Linux but some commands may be unnecessary.
- You have installed but not configured MySQL or Apache. They should be installed by default. If they aren’t you can download them or install them using the “pkgtool” or “installpkg” command in Slackware.
If you’re installing from scratch and are not certain which packages to choose, simply install them all. It’ll save you time and you can always remove the unnecessary packages afterwards using the above mentioned tools. I won’t be covering how to install Slackware in a dual boot scenario or in a virtual machine it’s been done enough times.
To begin we have to configure the mysql application. I believe the instructions below can also be found inside the rc.mysqld file. The first thing to do is configure mysql to start up automatically. As root open a console and type each line one line at a time. To clarify the first step is to type “chmod 755 /etc/rc.d/rc.mysqld” without the quotation marks and then press the enter key. Do this for each step, pressing the enter key after each command:
- chmod 755 /etc/rc.d/rc.mysqld
- mysql_install_db
- chown -R mysql:mysql /var/lib/mysql
- chmod 755 /etc/rc.d/rc.mysqld
- /etc/rc.d/rc.mysqld start
- /usr/bin/mysqladmin -u root password yourpassword
- mysql_secure_installation
Now I’ll quickly explain what each command does:
- Makes the mysql program to executable (this means it’ll start automatically when you reboot).
- Runs the setup scripts
- Changes the owner of the /var/lib/mysql directory to mysql
- Here we’re resetting the permissions once more to ensure it’ll start up upon reboot. I believe this is required because of the command used at #3. If I’m wrong please feel free to enlighten me.
- Starts the mysql server (required for the next step)
- This is the important one: Where it says “yourpassword” you have to choose your own password. This is where you’re choosing what the root password is going to be. I suggest making it something complicated and storing it in a secure location.
- Secures your mysql server application. For the most part this is self explanatory, just follow the prompts.
Your mysql server should now be up and running if you did not encounter any errors. We’ll now move onto configuring the web server, which is called Apache. We’re going to have to start editing some files so pick your favorite file editor and get ready. If your new to Slackware and aren’t certain how to start the X windows server, simply type “start x” into a command line and once more if all goes well you should be in a graphical environment.
I suggest always making a backup of any file you’re about to edit. Believe me this will save you some time in the long run and is a good habit to practice. For instance the first file we’ll be editing is /etc/httpd/httpd.conf. I like to rename my backups to httpd.conf_original.
Once you have /etc/httpd/httpd.conf opened we’re going to be editing a few different areas. At the very bottom of the file you’ll see this line:
#Include /etc/httpd/mod_php.conf
The “#” symbol in the front means in simple terms “don’t use this”. We want to remove the “#” otherwise we won’t be able to get wordpress or phpmyadmin working in the later steps.
Go ahead and delete the # so that it now looks like
Include /etc/httpd/mod_php.conf
In the same file locate this section:
“# DirectoryIndex: sets the file that Apache will serve if a
# directory is requested.
#
<IfModule dir_module>
DirectoryIndex index.html
</IfModule>”
Here we want to add index.php to it so that the section now looks like:
<IfModule dir_module>
DirectoryIndex index.html index.php
</IfModule>
One last modification needs to be made in this file. Look for this section:
#
# AllowOverride controls what directives may be placed in .htaccess files.
# It can be “All”, “None”, or any combination of the keywords:
# Options FileInfo AuthConfig Limit
#
AllowOverride None
Change the None to All, so that the line now looks like:
#
# AllowOverride controls what directives may be placed in .htaccess files.
# It can be “All”, “None”, or any combination of the keywords:
# Options FileInfo AuthConfig Limit
#
AllowOverride All
Now that we have finished with the httpd.conf you should restart the Apache server so that it recognizes the changes we’ve made. You can do this by running this command (without the quotation marks):
“/etc/rc.d/rc.httpd restart”
At this point Apache should now be up and running. If you open up your favorite browser (Firefox right?) and enter the address “http://localhost” you should see the line greeting you:
“It works!“
Lets move on to configuring phpmyadmin so that we can get WordPress up and running afterwards. You could do this without phpmyadmin but it’s a useful database management tool so I suggest you install it. It’ll simplify some tasks that are required later on should you want to setup a backup of your WordPress blog. These instructions are for those who will be downloading the tar.gz version of php my admin:
- “cd /var/www/htdocs”.
- “tar -zxvf phpmyadmin<version number>.tar.gz”
- “mv phpMyAdmin<version number> phpmyadmin” (take note there’s a space)
- “cd phpmyadmin”
- “cp config.sample.inc.php config.inc.php” (again take note there’s a space)
A few quick words regarding steps 1 and 2. If you know what you’re doing you can unzip the file by several methods. I find it easier to first make certain I’m in the “/var/www/htdocs” directory before unzipping phpmyadmin<version>.tar.gz and wordpress.tar.gz files. These commands also assume that you have phpmyadmin<version>.tar.gz and wordpress.tar.gz in the “/var/www/htdocs” directory. If not move them or copy them there.
Step 3 is basically renaming the folder by moving it. It makes it easier to access via web browser at a later time. Rather than typing http://localhost/phpMyAdmin<version number> it’ll allow you to type http://localhost/phpmyadmin
Step 4 and 5: Changes our directory to the phpmyadmin directory and creates the config.inc.php file which the phpmyadmin server needs. We’re going to be editing this file so go ahead and open up your favorite editor and find the line:
“$cfg[‘blowfish_secret’] = ”; /* YOU MUST FILL IN THIS FOR COOKIE AUTH! */”
Here we must enter your own value in between the two _’_ just before the _;_. We can put any value in there, for instance I use abcd1234:
“$cfg[‘blowfish_secret’] = ‘abcd1234’; /* YOU MUST FILL IN THIS FOR COOKIE AUT*/”
We also want to change the authentication type. Scroll down a little and look for:
“$cfg[‘Servers’][$i][‘auth_type’] = ‘cookie’;”
We need to change the cookie value to http. So the line should now look like this:
“$cfg[‘Servers’][$i][‘auth_type’] = ‘http’;”
Save your changes and exit the file. If everything has gone according to plan your phpmyadmin should now be working. Try entering “http://localhost/phpmyadmin” in your browser. You should be prompted for a username and password. Remember earlier when we set the root password for mysql? This is what it’s prompting you to enter. For the username enter “root” (assuming you haven’t setup a different mysql user account) and for the password enter the secure password you chose.
If for what ever reason you go to http://localhost/phpmyadmin and it’s showing you a bunch of text rather than prompting you for a password it could mean a few different things. I recommend rebooting and then trying it again http://localhost/phpmyadmin. If it still doesn’t work check the files you edited to ensure you didn’t miss a “space” or enter some other character by accident.
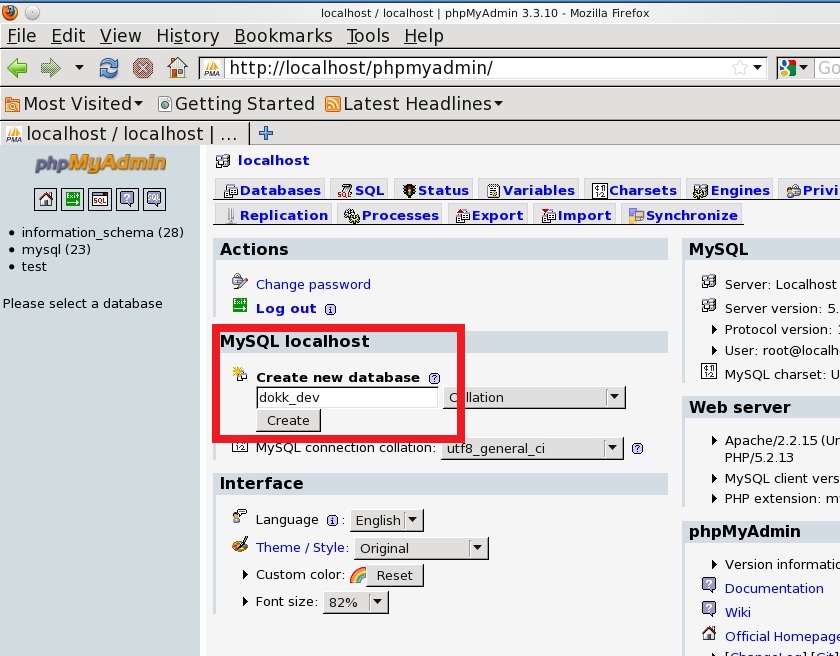
So you’re logged into phpmyadmin. The first thing we need to do is create an empty database that will be used by WordPress. This is pretty simple, enter the new database name and then click on the create button (see the pic below). You should then see the little green check mark with the message “database <name you picked> created” beside it. That’s all there is to it.
Quick side note: If you’ve created different users, you may have to grant them permissions to the database. If you leave it “as is” it will assume you’ll be using it as the root user. You can log out of phpmyadmin (or you can leave the window open; we’ll be returning to it a little later if you plan on setting a WordPress development environment).
Now that we have an empty database we’re going to install and configure WordPress and tell it to use the database we just created:
- “cd /var/www/htdocs”
- “tar -zxvf wordpress<version number>.tar.gz”
- “cd wordpress”
- “cp wp-config-sample.php wp-config.php ” (again take note there’s a space)
You should now be familiar with the above commands. You’re changing directory to /var/www/htdocs, extracting WordPress, changing directory to the WordPress folder and copying the file to a new name. We now have to edit the wp-config.php file. Fire up the editor once more and look for the lines indicated below. They should be near the top of the file and bunched together:
/** The name of the database for WordPress */
define(‘DB_NAME’, ‘database_name_here’);
/** MySQL database username */
define(‘DB_USER’, ‘username_here’);
/** MySQL database password */
define(‘DB_PASSWORD’, ‘password_here’);
You may have a good idea as to what needs to be placed in here but just to be safe let me confirm it! First it’s asking us to confirm the database name:
/** The name of the database for WordPress */
define(‘DB_NAME’, ‘Your chosen database name‘);
In my case I called my database “dokk_dev” (you can see it in the phpmyadmin screenshot above). Whatever name you chose for your database enter it here. My entry would look like:
/** The name of the database for WordPress */
define(‘DB_NAME’, ‘dokk_dev‘);
Next it’s asking us for the mysql username. If you haven’t changed the default settings you should simply have to enter “root”.
/** MySQL database username */
define(‘DB_USER’, ‘root‘);
Finally it’s asking for the password to the mysql root account. This is the password that you chose at step 6 during the configuration of the mysql server earlier.
/** MySQL database password */
define(‘DB_PASSWORD’, ‘password‘);
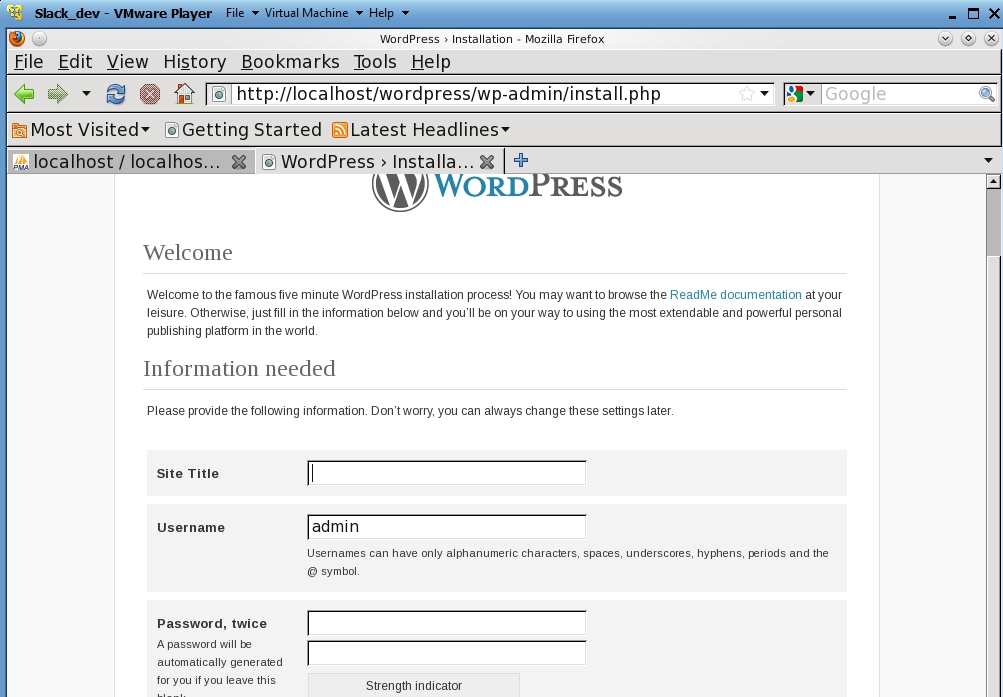
Save your changes and exit the file. Guess what, if you’ve followed all the steps appropriately you should now have a working WordPress installation. Go to your browser, enter http://localhost/wordpress and you should be greeted with the WordPress setup page:
Enter the title that you’d like for your site, enter the admin username and choose a new password. Take note this is the password for the WordPress administration console (ie your blog back end, where you will create, modify, and post articles or designs etc). As a general rule of thumb I like to change the admin account name from “admin” to something different. It makes it that much harder for script kiddies to get into your account. So rather than leaving it as is, consider changing it to something slightly different such as “admin_user” or something similar.
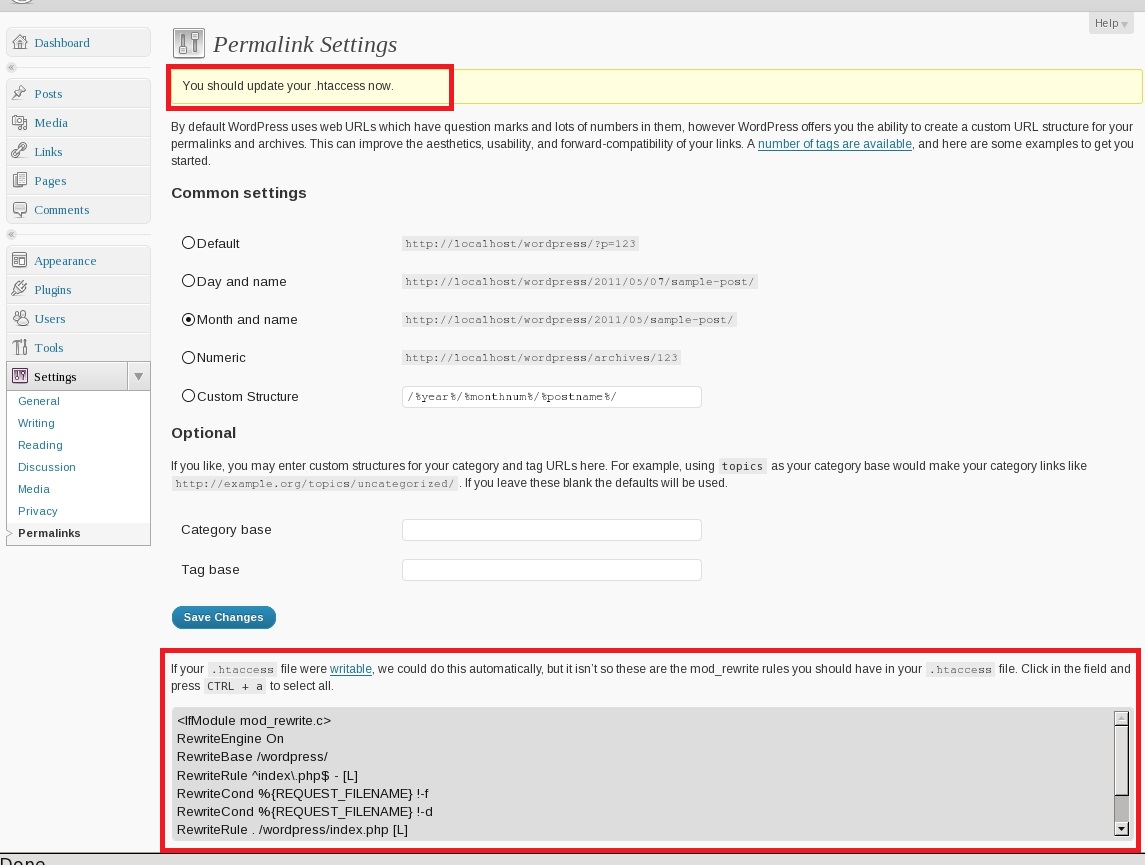
Click on install, log on using the username and password that you just chose and you should see the WordPress Administration console. There’s only one last command we need to run and we’re done, I promise. Currently if you try to change the permalinks (the way WordPress displays the post information) it will generate a warning at the bottom of the page and will refuse to display your permalinks correctly (you’ll get a “page not found 404 error”). Take a look at the screen shot from the WordPress admin console:
Fixing this is fairly simply. Open up a console and at the command line and enter:
“chown -R apache:apache /var/www/htdocs/wordpress”
This command changes the owner of the WordPress folder to the Apache user. It allows WordPress/apache to handle changing the permalinks on your local machine. Congratulations you’re now running WordPress on your very own Linux machine. Assuming of course everything went as planned.
If all you wanted was to setup your first LAMP system you should be good to go. Now as previously mentioned the reason I wanted to setup this environment was to run a “backup” or a “development” version of my site so that I could test changes before placing them on my live site. In order to be able to use a “copy” or “backup” of your site you’re going to need a few things from your “live” site.
First you’re going to need a recent copy of your database. There are several ways to get a copy of your database. I personally suggest using a plugin, there are several that will allow you to backup your database and download it from within the WordPress admin console using your browser.
Secondly you’re going to need your “live” content. That’s all the pictures, videos, post, etc that you have created on your live site. This could be a little harder to obtain depending on where you’re hosting your site. The files are located in the wp-content/uploads folder on your live site. I used ftp to connect to my live site, proceeded to download (make a copy of) the “uploads” folder to my local machine.
So now that you’ve got your database backed up as well as the content from your live site, how do you go about setting it up in your shiny new development environment? It’s not too complicated but it does require a little bit of tinkering.
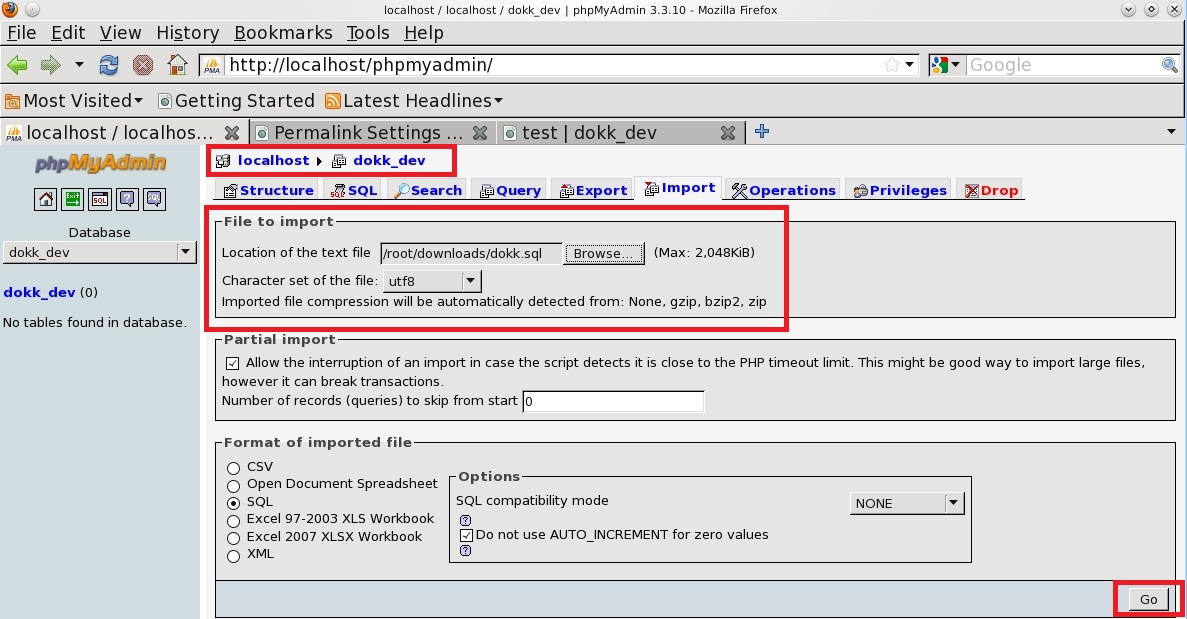
Log into your phpmyadmin console and click on your the database you had created earlier. In my example it was called “dokk_dev”. Select the import option and then locate the copy of the live sites database. Notice on the screen shot below that I’ve already clicked/selected the dokk_dev database and I’m getting ready to import the data from my live sites database into the dokk_dev database.
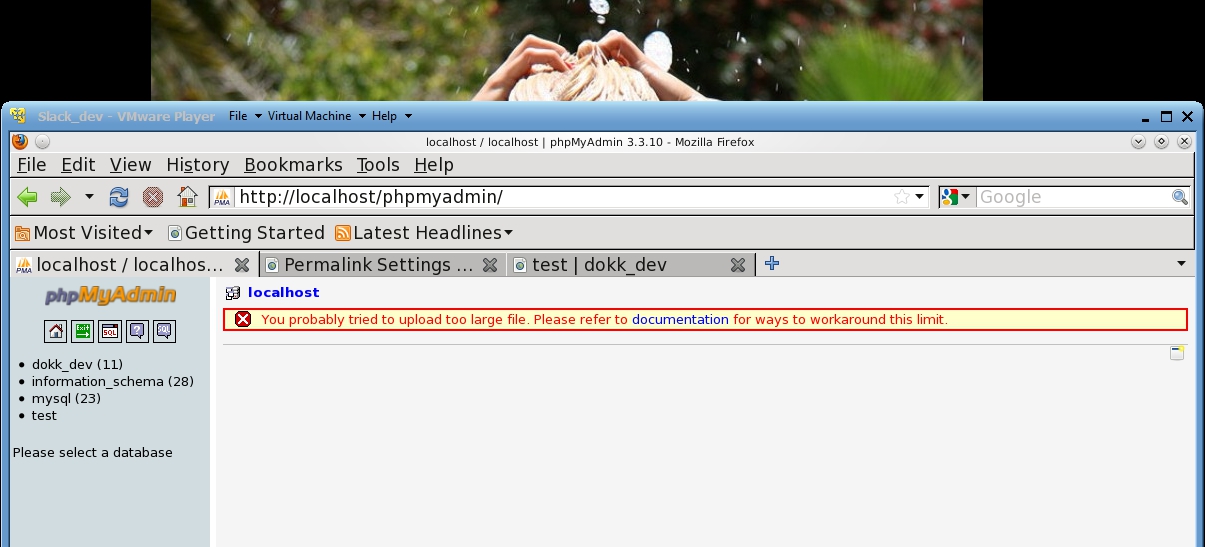
Depending on the size of your database you may encounter a warning saying “the database exceeds the file size limit” or something similar. I’ve included the error message that may appear, depending on the size of your database:
This is another easy fix so don’t panic, open up your favorite editor once more and get ready to edit this file:
/etc/http/php.ini
The entry we’re looking for is this one:
“; Maximum allowed size for uploaded files.
upload_max_filesize = 2M”
Modify it to:
; Maximum allowed size for uploaded files.
upload_max_filesize = 20M
Depending on the size of your database you may need to make that number larger. I also modify in the same file the “post_max_size = 10M”. I change it to 20M as well but I’m not certain if that’s really necessary.
You’ll have to restart Apache for it to recognize the changes so once more we run:
“/etc/rc.d/rc.httpd restart”
Now that we’ve fixed that issue go ahead and import your database. If for whatever reason that doesn’t work just reboot the machine and you should be good to go. At this point phpmyadmin should allow you to import your database as long as it’s under 20M (megabytes) in size. If all goes according to planned you’ll get a similar message:
If you haven’t already done so log out of the wordpress admin console now.
So phpmyadmin has successfully imported your database. You’re excited; you have a working backup of your site but hold on there’s still a problem. Have you picked up on it yet? If you visit “http://localhost/wordpress” you will see your site. However if you click on any of your post you’re going to be redirected to the live site. For instance with our current setup if I go to http://localhost/wordpress and click on one of my articles “Storm drain street art, Seoul South Korea” I’ll be redirected to “http://www.dokk-aebi.com/2011/05/04/storm-drain-street-art-seoul-south-korea/” which is my live site.
We don’t want this. We want to be able to make changes to our local site without it pointing to the live site when we want to verify them.
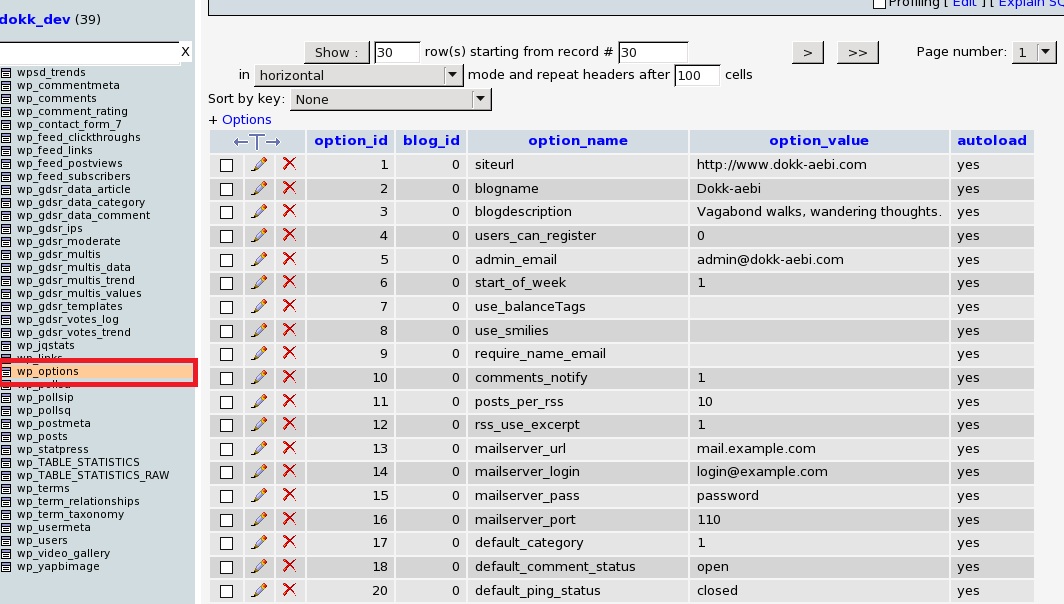
We have two final edits to make. Head back over to your phpmyadmin console; http://localhost/phpmyadmin. Click on your database (in my example dokk_dev). You should now see a screen very similar to the one below. We’re looking for the “wp_options” table. I’ve encased it in red below. Go ahead and click on it on the wp_options that i’ve pointed out.
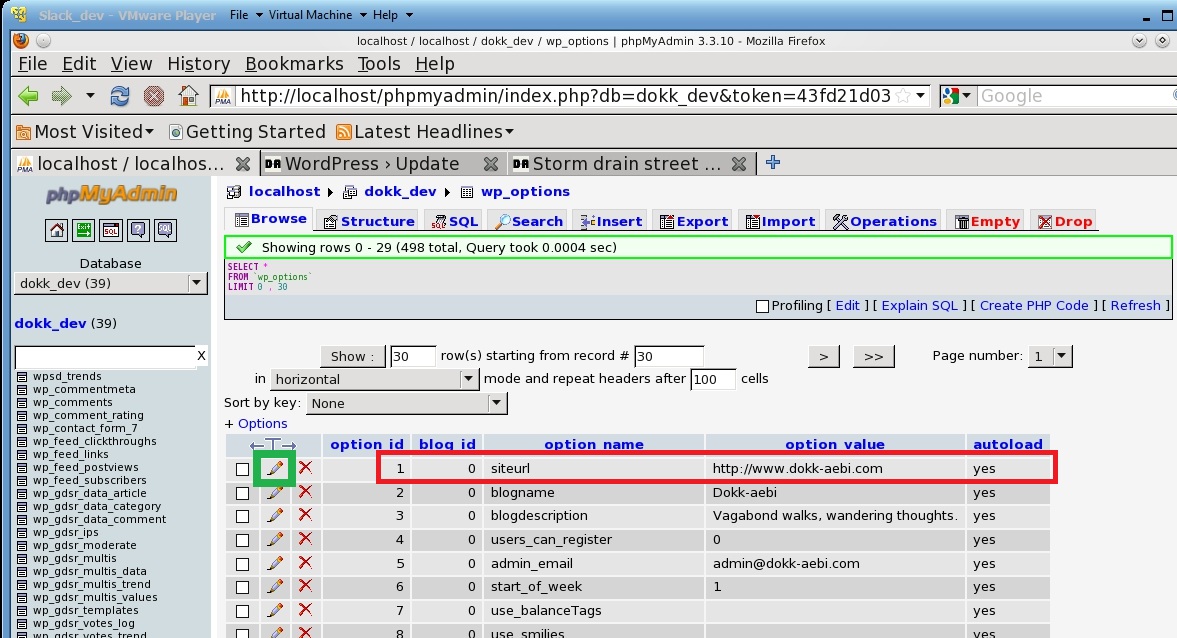
It’s going to open the wp_options table and you’re going to see some further listings. We’re not too concerned with them except for the listing called “siteurl”. We’re going to want to change this from www.yourlivesite.com to “http://localhost/wordpress” (again without the quotation marks).
To do this you have to click on the small pencil which will open another window. I’ve encased it in the green box so it’s easier to spot.
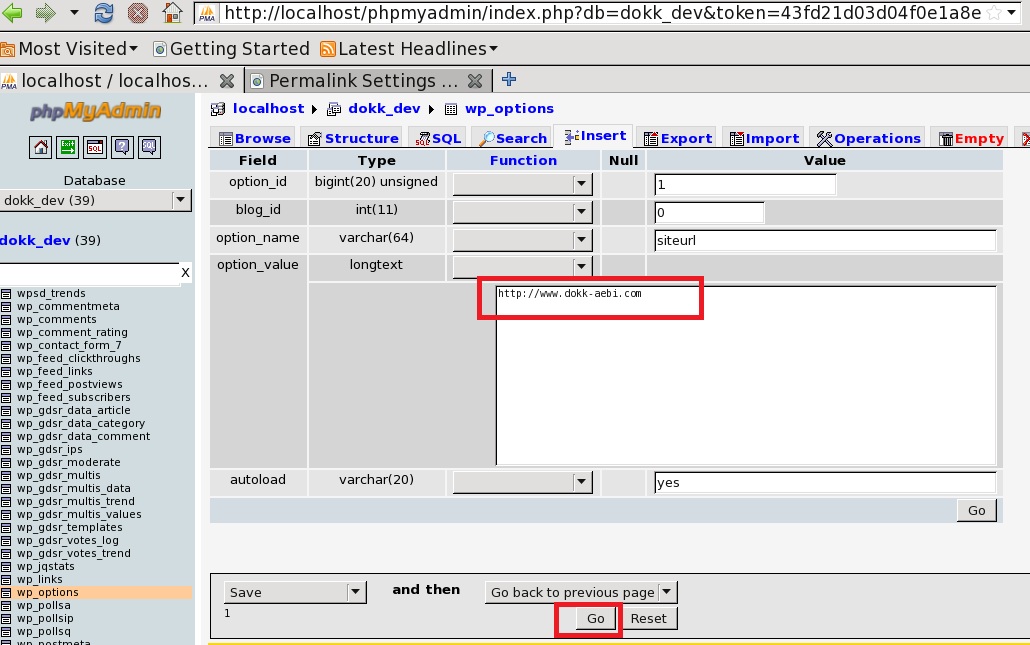
You’ll then find yourself at this screen:
Add the localhost address as indicated above and click the “go” button which should be located at the bottom right hand of the screen.
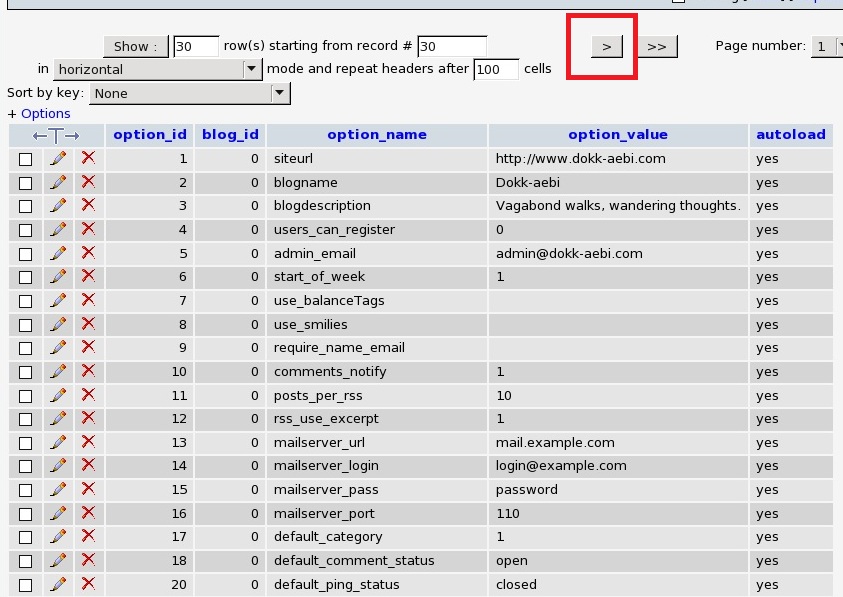
We now repeat the same process for the “home” option found on the next page. The first few times I tried to locate the “home” entry I was left scratching my head until I noticed the little square > button that I’ve pointed out for you:
Click on it and then look for the “home” entry, Once more change it from www.yourlivesite.com to “http://localhost/wordpress” (again without the quotation marks). For example In my case I changed it from http://www.dokk-aebi.com to http://localhost/wordpress. Don’t forget to click on the “go” button to save the changes.
So now when you click on a post it’s going to “http://localhost/wordpress/2011” instead of http://www.yourliveaddress. This is what we wanted.
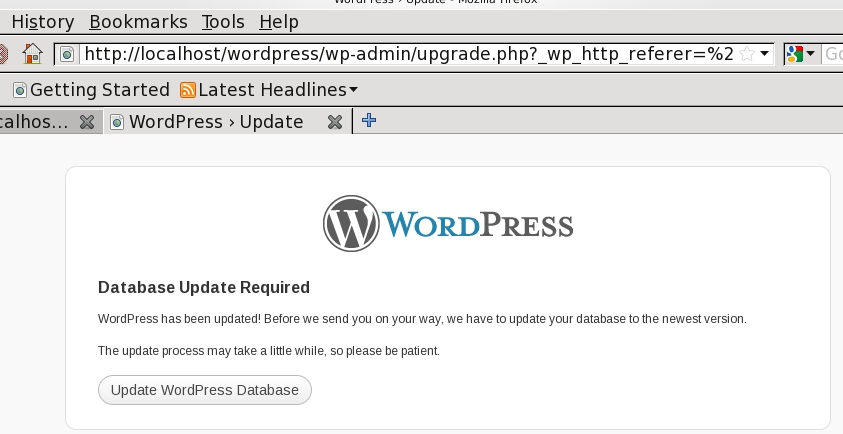
It’s now time to log onto our wordpress admin console again. Point your browser to: “http://localhost/wordpress/wp-admin”. You’ll be greeted by a WordPress page indicating that your database needs to be updated (this is because of the imported data we placed into it):
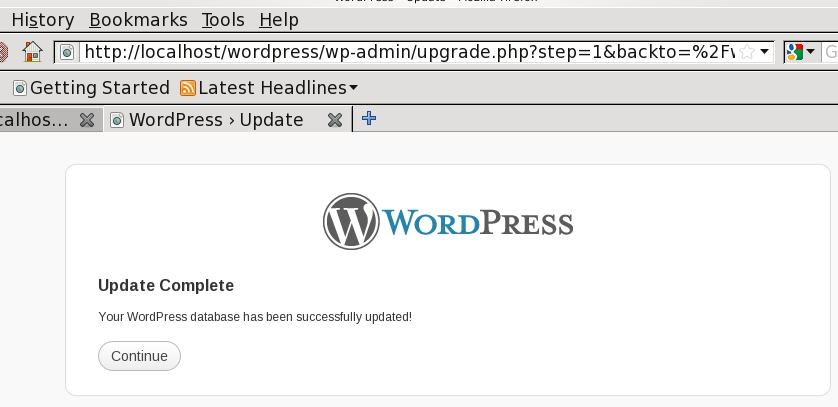
Click on proceed, depending on the size of your database and the speed of your pc the time for this to complete could vary. In my case it only takes a few seconds and you should then see:
It will now return you to the WordPress admin login page. Remember the WordPress username and password you chose earlier on when configuring WordPress for the first time? Don’t use that username and password!
Since we’ve imported the database from our live site, WordPress now expects us to enter the username and password to the admin console of our live site. So even though you’re using a backup WordPress development environment you have to enter the username and password from your live site. This is because we imported all the information from our live sites database into our development database. It may be possible to change these values in a similar way as we did with the “home” and “siteurl” earlier but I didn’t investigate this any further.
So using your live credentials you’re now logged onto your development WordPress admin console. Take a moment and have a look at one of your post that includes pictures. You’ll notice that instead of showing the pictures it’s showing you something similar to this:
This is because we haven’t uploaded our content folder yet! Remember at the beginning we had to create a backup of the database and the wp-content/uploads folder. It’s now time to copy the contents of the backup wp-content/uploads folder to the same location on our development site. To do this I again used ftp (see note on this at the end of the post).
So to try and explain what’s happening here in a slightly clearer fashion I’m going to use some basic explanations:
Site A is our live WordPress blog on the internet. Site B is our backup development blog that only you can see. We move the wp-content/uploads folders from site A to the same location on site B (the wp-content/uploads). Over writing the files if necessary. Pay close attention when copying/moving the files. I’ve encountered issues with ftp not having the permissions to overwrite a folder, so I had to go one folder deeper and then copy the files (for instance wp-content/uploads/2011/ because it could not write into the 2011 folder).
Once the files have finished copying I like to run the “chown -R apache:apache /var/www/htdocs/wordpress” one last time command just to make certain apache has the proper permissions to access the new content we’ve placed. I don’t know if this is necessary or not.
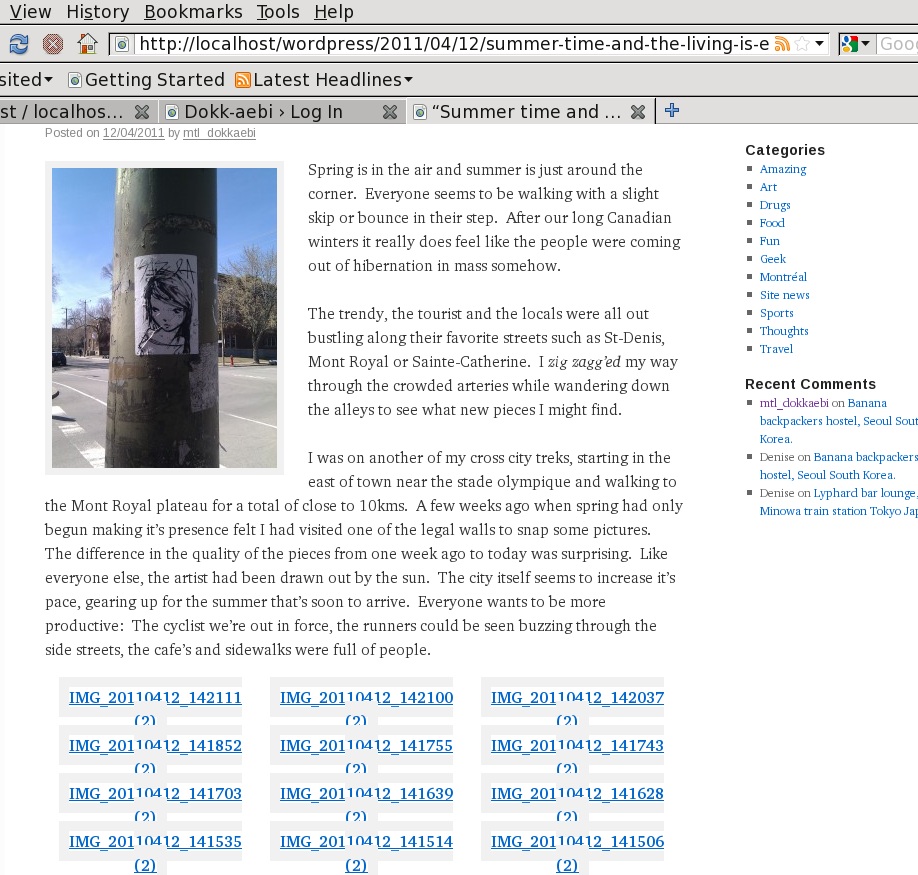
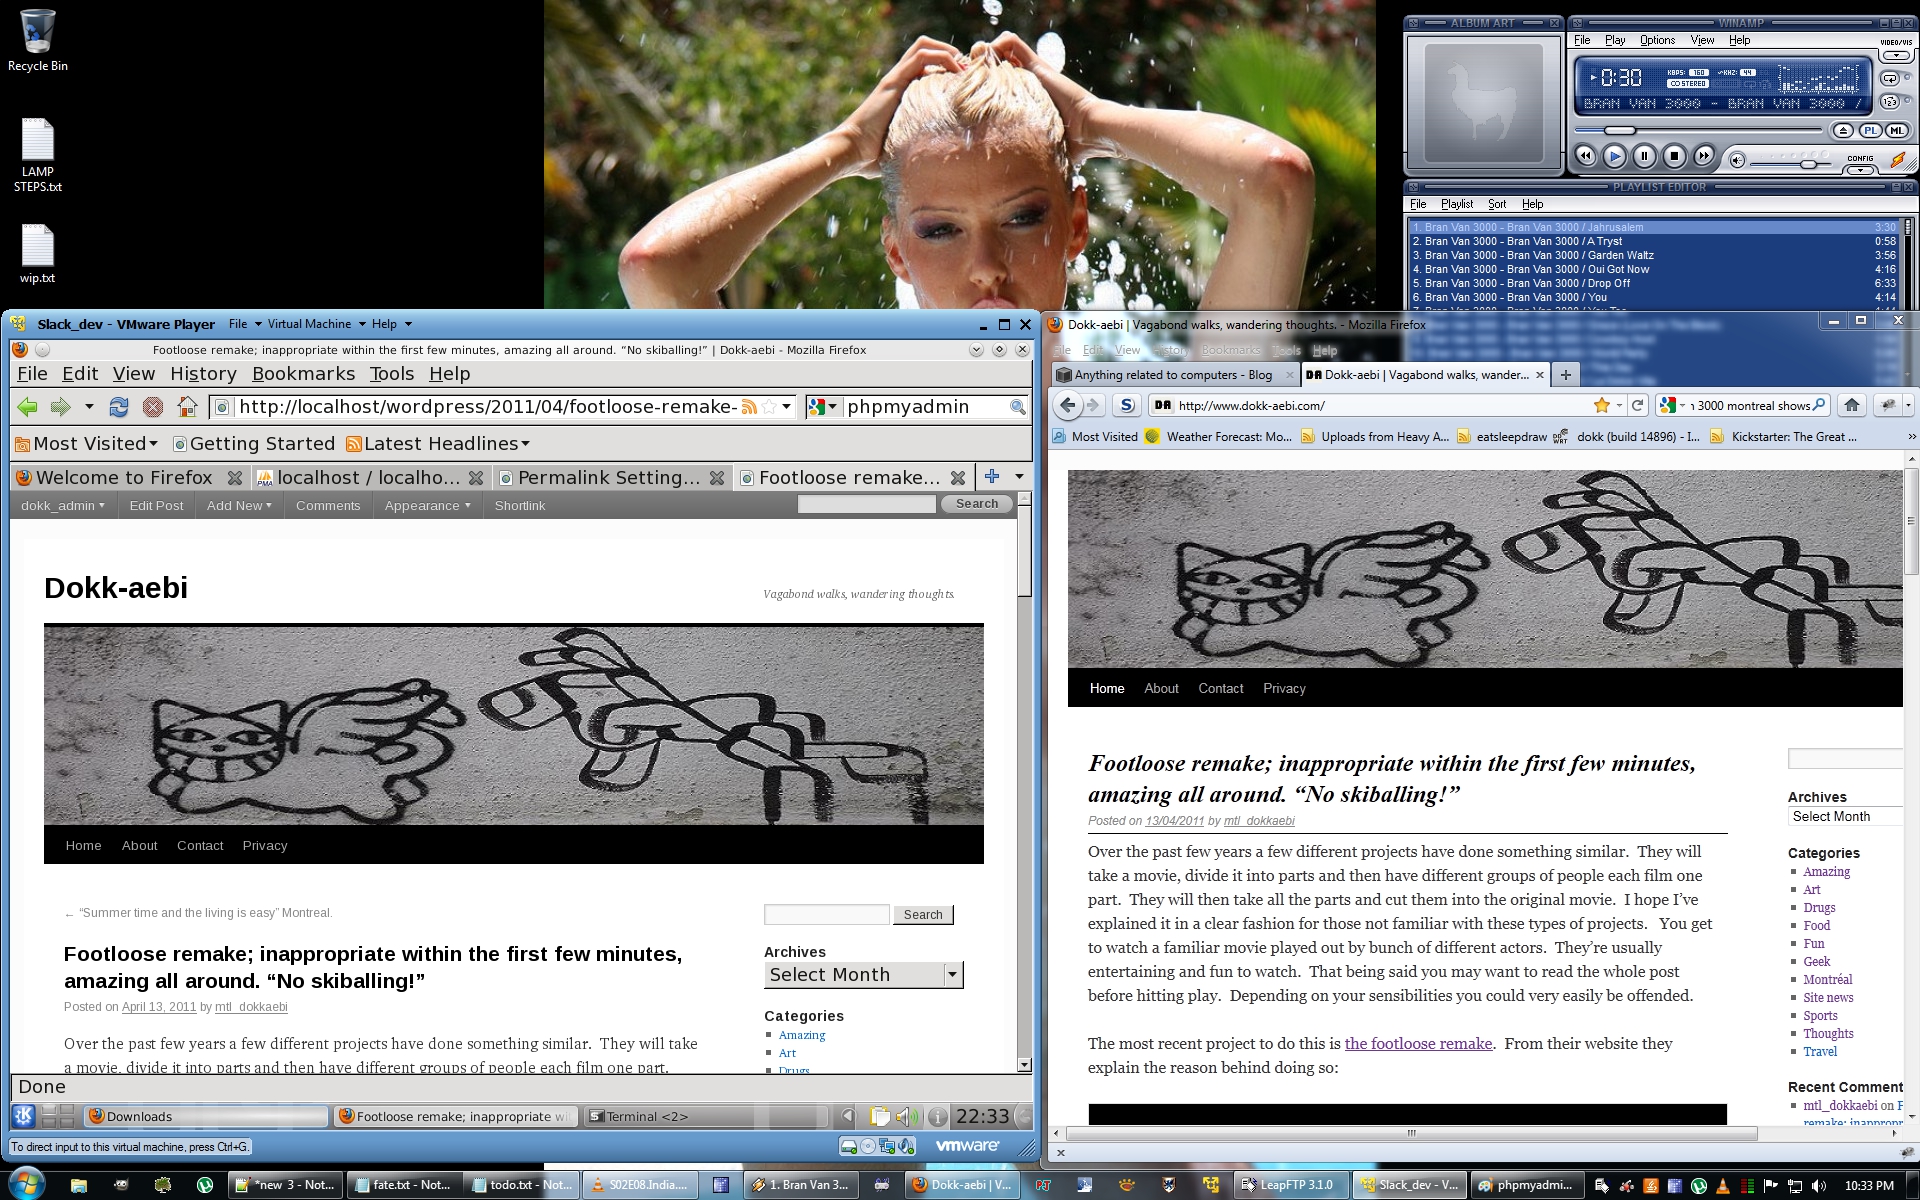
That’s it. Once you’ve copied over the wp-content/uploads folder you’re truly done. All the images should now link properly and all your content should be on your local development machine. If you’re lucky you’ve got something similar to this (my “live site” and my development site running side by side):
A couple of parting remarks:
- I’m using ftp to move my files around. There are much more secure and safer ways to do this. I use ftp because as soon as I’m done transferring the files I disable the account. If you’re at all worried about security, use ssh or sftp to transfer the files.
- If you’re using a bunch of plugins on your live site you may be tempted to copy the “plugins” folder along with the “uploads” folder. I personally recommend against it. When I tried to do so it broke WordPress in my case.
- I’m running Slackware in a virtual machine. For this reason I’m not too worried about running as root on this machine. It’s behind several firewalls. If you’re concerned about running Slackware or Linux in an insecure environment, setup a new user account and only log into root when required. Always log in using the new account rather than root.
- As a general practice I always keep a clean (ie backup) copy of my Slackware and Windows/XP/7 virtual machines. If you’ve got enough space to permit it I highly suggest you do so. For instance I use my windows machine to visit dangerous sites that are usually infected with malware (viruses). Once the windows machine starts getting full of spyware or viruses I simply delete that copy of the virtual machine. I then make a copy from the “clean” backup that I keep and start over. This is much easier than having to re-install the whole operating system each time and much safer when visiting some of the more ‘interesting’ places on the net.
- I personally use VMware to run my virtual machines. When using slackware I encountered some difficulties installing the vmware tools. These come in very handy when copying and pasting (editing) files. The quick fix was to first create the directory /”etc/pam.d” as vmware expects it to be there. You can then run the vmware tools install script. The script will hang when doing the X server test. Open a second command line and kill the mkinit (do a ps listing or a top to find mkinit). The script will then finish running. Run the”/usr/bin/vmware-user” command from the command line while in the X server to enable the advanced features. Doing this allowed the screen resize to work. Stop and restart X after having started the vmware-user command above to ensure it properly saves the changes. I think this issue arises because of the Slackware directory naming convention but I didn’t have the interest to investigate further and this quick hack seems to get vmware tools working.
- Finally If you have any tips or suggestions, or if you notice any errors please let me know, I’d appreciate the feedback. Specially if you have suggestions concerning security and ensuring I’m using the correct file permissions on files and folders.
It took me a couple of weeks to piece all of this together. I’m posting it as a reminder for myself so that I don’t have to go searching for these steps in the future. Hopefully it’ll come in handy to those trying to setup their own LAMP machine or a WordPress development environment
mtl_dokkaebi


2 Responses to Slackware LAMP howto and wordpress backup